In the world of driving, understanding traffic rules and right-of-way scenarios is essential for staying safe on the road. Today, we’re diving into a traffic knowledge test to determine which car has the right of way in a particular situation. It’s a challenge that not only tests your road skills but also sharpens your ability to make quick, informed decisions behind the wheel.

Let’s break down the scenario and figure out which car gets to move first, and why.
The Traffic Scenario: Car A vs. Car B
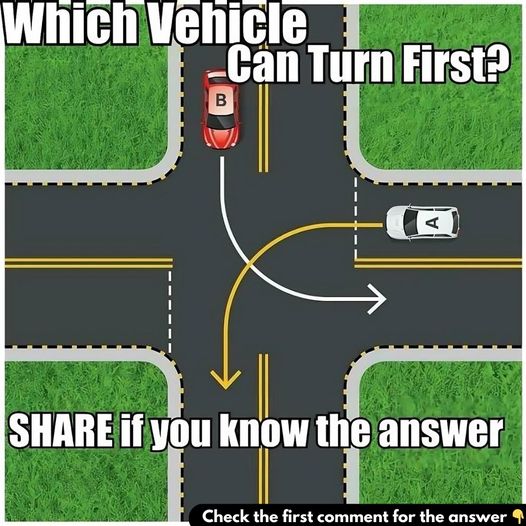
Picture this: two cars approach an intersection with no traffic signs. Car A (white) and Car B (red) are both ready to make a turn, but the question is: which car has the right of way?
Without the guidance of stop signs or traffic lights, and with only the road markings to go by, it’s crucial to analyze the details carefully to make the right call.
Key Observations: Dotted Lines and Their Importance
In this scenario, there are no visible signs, which can initially make it challenging to determine who has priority. However, there’s one critical detail that helps us understand who should go first: the dotted lines on the ground.
These dotted lines, known as yield lines, are essential in traffic management. When a car approaches an intersection and sees these lines, it typically means that the vehicle must give way to any traffic passing through. In this case, one car will need to yield to the other before making a move.
Understanding Right of Way: Who Goes First?
Now that we’ve identified the key element—the dotted lines—we can make an educated decision. Based on this indicator, here’s what we can conclude:
- Car B (red) has priority. Since Car A (white) is behind the dotted lines, it must yield to Car B, which doesn’t have any yield markings.
- The cars cannot make the turn at the same time due to the high risk of a collision if both attempt to pass simultaneously.
Therefore, the right of way goes to Car B. Car A must wait until Car B safely completes its turn before proceeding.
Why Car B Has the Right of Way
The decision about who goes first in this scenario isn’t just about common sense—it’s about understanding the road rules. Without traffic signs, we rely on markings like the dotted lines to guide our decisions.

In this case, the yield markings dictate that Car A must wait, ensuring the flow of traffic is safe and orderly. Intersections can be tricky, but markings like these provide clear instructions even when signs are absent.
What Would You Do in This Situation?
If you were behind the wheel of Car A, would you immediately proceed, or would you wait for Car B to pass first? It’s important to note that in uncertain traffic situations, being cautious is always a good strategy.
Here’s what you should do in such scenarios:
- Observe road markings carefully. Dotted lines or solid lines provide clues about who has the right of way.
- Assess the speed and position of other vehicles. It’s essential to ensure that there’s enough space to safely make a turn or proceed through the intersection.
- When in doubt, yield. If there’s ever uncertainty about right of way, it’s safer to allow the other vehicle to go first. This avoids accidents and ensures smoother traffic flow.
The Dangers of Simultaneous Turns
Some drivers might wonder if it’s possible for both cars to make the turn at the same time. After all, wouldn’t that save time? The answer is no—trying to turn simultaneously in this scenario is extremely risky. Without clear signs or light signals to control traffic, both cars moving at once increases the likelihood of a collision, especially if one driver misinterprets the other’s intentions.
When two vehicles enter an intersection at the same time, the potential for confusion is high. For safety’s sake, it’s always better to allow one car to pass before the other makes their turn.
Conclusion: Car B Has the Right of Way
In this particular traffic situation, Car B has the right of way. The presence of the dotted lines indicates that Car A must yield to Car B, which does not have any yielding lines or stop signs.
Traffic scenarios like this can be confusing, especially when signs are missing, but understanding how road markings like yield lines work is crucial. In this case, the simple rule is that Car A must wait for Car B to pass safely before it makes its move.
Did you get the answer right? If so, congratulations! You’ve just sharpened your traffic knowledge and are better prepared for future road situations. Share this challenge with your friends to see how they fare and to help them boost their driving skills as well!