Starting seeds indoors at home — this simple idea probably causes the greatest mix of either anxiety or eternal optimism of any aspect of gardening that I’ve helped people with in my years of growing vegetables at home. In reality, it warrants neither end of the spectrum. In many cases, it’s not quite as easy as so many kindergarten teachers have made us believe in our “green bean in a plastic cup” experiments in school, but at the same time, with some basic knowledge, some do’s and don’ts, and a bit of good preparation, it’s certainly no reason for anxiety.
I’ve started hundreds of plants indoors in the dead of winter: I’ve been successful, and to be honest, I’ve failed a few times as well, but I’ve gained a good understanding of what to do and what to not do (or watch for) through those successes and failures.
There are a lot of reasons why people decide to take on indoor seed starting. Perhaps your potted starts are beginning to get a little too pricey for your garden budget because, like me, over the years your garden has expanded and grown to proportions that just get too darn expensive to buy potted starts for all your needs.
Maybe as you’ve seen how successful you can be, you’ve decided you want to branch out into some more “exotic” varieties to really get a bang for your garden buck, but you can’t seem to find starts for these plants locally. There are few better ways to ensure your garden investment than to grow those expensive or hard-to-find specialty items that you can’t find at the local grocers.
It could be as simple as you’re just a do-it-yourselfer at heart and want to take charge of that one final element to your garden you have been relegating to the nursery, or to enjoy a fun experiment with your children. Any or all are great reasons to take the challenge on, and knowing what’s driving you is a big deal in determining how you decide to scale up and move forward.
So the first step is to identify why you will be starting seeds indoors, and what you hope to gain from it. A clear understanding of why you’re doing this is the best way to know whether you were successful in your endeavors, and success is the best reason to continue to try new things.
Vegetables Suited to Seed Starting Indoors
Before I get into a lot of specifics regarding the seed-starting process, it’s important that you have a pretty good idea of how many plants you want to start indoors and what plants are worth the time, effort, and money. A few favorites like peas and carrots are not really worth starting indoors. Both can be sown into the soil outdoors pretty much as soon as any snow has melted in northern climates, and whenever the season is best in southern climates. Starting them indoors often leads to leggy plants that end up needing a period of hardening off later, and carrots should in fact be planted directly in the ground very early in the season, as they will always require thinning. It’s just not viable to start these indoors.

On the other hand, plants that have a long life cycle prior to their harvest — tomatoes, cucumbers, peppers, broccoli, Brussels sprouts — are prime candidates for starting indoors. It can put your harvest a month or two ahead of time, or in some cases make it possible to get a harvest at all depending on your climate. Identify the plants that need an early indoor start and how many you’d like to have in your garden at planting time. After identifying how many you’d like to have, it’s a good idea to add roughly 20 percent on top of that. That’s a good way to compensate for unhealthy starts or losses, or in best-case conditions to allow you to pick and choose the best starts for your garden and possibly gift the rest to a friend, a child’s school, or new gardener to get them started.
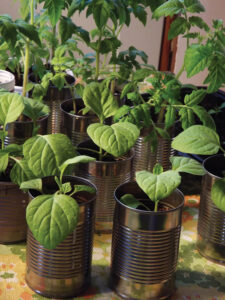
Getting started with starting seeds indoors can seem like an expensive venture, and in many ways, it can be. There is the expense of buying starting trays, potting soil, possibly lights, and fashioning up some sort of seed-starting structure, plus the cost of seeds, fertilizers, and the time involved — it can all add up. On the upside though, with a bit of care and planning, many of these materials can be fashioned from things we already have, recycled and then reused for many seasons. Each new season drops the cost of that initial investment against all starts that have come from them. Here are some ideas I’ve used to cut my costs that have worked out very well.

Starting Trays/Pots
Because I wanted to start my seeds in a uniform space and have control over the uniform size of the pots to control watering, heat, and light, I decided to use the same type of four and six cell-pack containers common in commercial growing operations. Gardeners can purchase them at a local greenhouse in most cases, or order online for a reasonable price. The key is to not destroy them when you plant your starts. With a little care, and if you allow the root ball to dry slightly before planting, the starts can easily be removed leaving the cell-pack intact and ready to be used again the next year. Just stack them inside each other and place them in a safe place, I used a 30-gallon plastic storage container for mine, and you can easily get two, three, or more years out of them.
Potting Soil for Seed Starting Indoors
There are a multitude of potting soils on the market, and you can easily spend quite a bit if you are looking to get just the right specialized “seed starting” soil. Essentially what this is, is soil that has conditioners to help the soil retain water at an even rate for a longer period of time, to be loose and friable for the tender roots to push easily though, and contains enough base nutrients to support the plants’ growth for the first few weeks of growth.
I tend to buy a few bags of different things for my garden each year to amend the soils as needed, and these same things make a great seed-starting mix with just a little work. Sifted compost is a great way to add organic matter and water retention ability to your garden soil, and it does the same thing in the starting mix. This becomes the base of the mix and should be about a two thirds of the mixture. I constructed a screening frame some years ago that has served me well to help with getting my compost to a structure that is good for seed starting. It’s simply an 18-by-24-inch frame built of some scrap wood with a piece of 1/4-inch rabbit wire stretched across it. I can place it over a plastic storage container and by putting the compost chunks from a bag or my compost pile onto it and rubbing it through the screen, I give myself a tub full of perfectly uniform and fluffy sifted compost without sticks or large pieces to use in my mix. Finally, I add vermiculite, or perlite if you prefer, to make up the last third and to help the soil further retain water and to give some structure and air space to the mix.
These amendments are mineral amendments that add no nutrients to the soil but are able to hold up to twice their weight in water while still leaving the soil loose and light. They can be purchased in 3-cubic-feet bags and kept for many seasons, so these are always in my garden shed. Mixing is a pretty technical procedure. I roll up my sleeves, bury my hands in the tub of soil mix, and have probably more fun than I should mixing the whole batch together. I generally sprinkle with a light bit of water to help pre-moisten the soil as well. This helps later when you first water the seeds to let the water break the surface of the pot easier and get the capillary action of the soil off to a good start.
Starting Seeds Indoors Under Lights

Because I start quite a few seeds for my garden, after my first year of doing it in front of a window on my kitchen table, I decided I needed a better solution for holding the trays, controlling the light, and maximizing the number of plants I’m able to start in as small a space as possible. This led me to design a diy grow light stand that I could set up in the spring, place wherever I wanted regardless of light availability, and be able to start 384 seedlings in four-pack containers. All this in roughly 2 feet by 4 feet of space. It was another investment in both time and money, but the return on that investment comes in each spring, for eight years now, and will continue to for the foreseeable future. There’s no one way to set this up, but some good things to consider in whatever you chose to use to hold your seedlings are that it allows good ventilation, has a waterproof base of some sort to capture spills or leaks, easily fits the trays you will be starting in, and can allow you to add lights and to adjust the lights’ height as the plants grow. Some consideration for storage is a good idea as well.
Seed Starting Light Colors
Artificial lights aren’t a mandatory addition to your seed-starting operation. A good south-facing window can work very well, but will require you to rotate your plants daily to keep them growing in an upright direction. I decided to use lights on my starting rack because they allowed me to control not just the direction the light was coming from, but also the number of hours of light that the seedlings receive.

If you do decide to use artificial light, there are a number of options. Specialty grow lights are available, but can be very pricey. Also, since lights are an expendable resource over time, this means having to replace those same specialty lights at that same or higher cost. I chose to use regular fluorescent lights that I could pick up at a local big-box store and install them in the most basic two-bulb fixtures available.
The reason for specialty lights is that plants absorb light in specific spectrums, and those lights are designed to provide that. After some research, I learned that the red and blue spectrums of light were the best for my plants and so purchased bulbs that were higher in each of those spectrums. Code words on fluorescent lights like “warm” or “cool” give you clues as to the spectrum of light they put out. Warm light bulbs are heavier in the red spectrum of light, whereas the cool light bulbs give off more of the blue. By looking at the bulbs available and choosing the ones with the highest output lumens, I was able to select two types of bulbs and placed one in each side of my two-bulb fixtures. My starting rack had two fixtures for a total of four bulbs per shelf.
In addition to the light fixtures providing light to the seedlings, I found that placing a thin reflective Mylar emergency blanket over the fixtures helped to keep the light on the plants and also prevented the plants from directing themselves right at the bulbs. This produced more consistent growth in the seedlings. Lights can be placed on a timer and turned on for cycles of eight, 12, or more hours per day to maximize the light the seedlings have to photosynthesize with.
How to Start Seeds Indoors: Planting
When it comes to planting the seeds, I recommend placing two or three seeds per cell-pack. Later, as the seedlings come up, you can easily snip off one or two seedlings with some sharp scissors to select the healthiest, and this gives you the best chance at good germination. As I plant, I use some old nail polish that I “borrowed” from my daughter, because it’s bright and waterproof, to put a number on the sides of my cell-packs and make a note in my garden journal of what plants I planted in each four-pack container. However you decide to track them, this is an important step. You’d be surprised at how similar those six different varieties of tomatoes can look! Water the seedlings in gently and cover the trays lightly with cling film to hold in the moisture until the seedlings begin to appear. Placing the lights directly over the trays, within 1 inch in fact, will add some heat to the soil and help with germination as well. Shorter light cycles can be used at this time as there is not plant growth yet.

Supplementary Heat, Care and Feeding
Your little nursery can be put pretty much wherever you would like as long as a few considerations are met. The placement of the seedlings should be in a spot with an even and preferably warm temperature. This could mean in front of a window or under a heat register, but cold temperatures will directly affect your seedlings. Phosphorus, for instance, will lock up in the soil and be unable to be taken up by the seedlings. Phosphorus in seedlings and young plants helps to form strong stems and rooting systems and is very common in home seed starting. Tomatoes are very susceptible and will show deficiency as purplish tone on the leaves and stems, and it’s nearly irreversible by the time it shows itself. I have never used seed-tray heating pads under my seedlings, but they are an option that is proven to help when a warm spot isn’t available.
Another consideration in building strong, healthy seedlings means roughing them up a little. In nature, as a seedling grows, it is exposed to wind and rain, animals brushing by it and the like. These things all strengthen the young seedlings as they have to fight against them to stay vertical. If you’ve started seeds indoors before and wondered why you had spindly plants, this could be part of the reason. I used an oscillating fan that I would turn on for an hour or so each day to blow the seedlings around and agitate them. I found doing this had a marked improvement on the strength and sturdiness of my seedlings. Another method is to use a small dowel and run it gently over the tops of the seedlings a few times to cause them to bend just slightly. This tells the plant that it has to fortify itself against this in the future and causes it to thicken and support itself better.
As for feeding, the starting mix that you used, whether store bought or if you created one like I explained above, will have a base level of nutrients. These will support the initial growth of the seedlings, but as they begin to develop into their first or second sets of true leaves, you will need to begin a regimen of fertilization. A well-balanced water-soluble fertilizer is best for this as it can be easily added to the watering schedule on a weekly basis. I have had good luck with Alaskan fish fertilizer in a very light mixture, but it does have a little smell. There should be directions listed on any product for use on seedlings, always follow these strictly as more is not always better.
Hopefully, with these insights you’ll feel confident jumping in and starting your own seeds indoors this season. It’s one of the most rewarding ways to increase your garden time and a great way to get one more layer of control over your harvest and the varieties you can grow. Enjoy the experience with a child, share the benefits with a new gardener, and above all have fun growing.
Patrik Garcia, a longtime Grit contributor, lives with his family in Salt Lake City, Utah, where they enjoy garden-fresh food throughout much of the year.
Originally published as “Succeeding with Seeds” in the January 2018/February 2018 issue of Grit and regularly vetted for accuracy.