
There are several different ways to train your tomato vines, each with its own difficulties. The classic, staking, requires tying the vines to a tall wooden stake. Ties can slide down the stake or strangle vines, or the vines can snap at the ties from their own weight. Cages made from panels of hog fence or concrete reinforcing wire mesh contain rampant vines, but they also create an impenetrable thicket, hiding the ripest tomatoes in the exact center of the cage. Fence-type trellises do create a manageable flat hedge of tomato vines, but they require more material and still risk broken branches when they grow too long before they’re woven back into the mesh. And let’s not even discuss store-bought “tomato cage” wire cones; they’re too flimsy for supporting tomatoes and work much better as pepper cages.

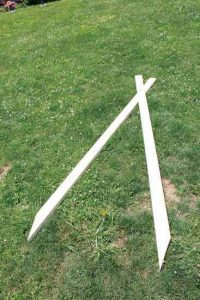
A-frame trellises actually use the tomato vines’ own weight to safely suspend them above the soil. An A-frame consists of four legs and a connecting ridgepole; a good example of an A-frame is an old pipe-frame swingset. While you could certainly use an old swingset as a tomato trellis, they can be hard to find these days, and they are hard to store in the offseason. Use the following instructions to build your own collapsible trellis from 2-by-4 framing lumber. Each trellis stands just over 7 feet tall and provides enough room for two to three tomato vines.
Materials
- 5 boards of dimensional lumber, 2-foot-by-4-foot-by-8-foot
- 2 stainless steel carriage bolts, 1/4-inch-by-3-inch
- 2 stainless steel wing nuts, 1/4-inch
- 2 stainless steel fender washers, 1/4-inch
- 4 stainless steel eye bolts, 1/4-inch-by-1-1/2-inch wood thread
- Sisal baling twine
Tools
- Pencil
- Tape measure
- Combination square
- Angle finder (optional)
- Wood saw, hand or reciprocating
- Drill
- 3/16-inch twist drill bit
- 1/4-inch twist drill bit
- 1-1/8-inch spade drill bit
- Screwdriver bit
- 1-inch wood chisel
- Mallet
- C-clamp

Building the tomato string trellis legs
- Select two straight 2-by-4s. Label one 3-1/2-inch “inside face” on each 2-by-4. Clamp together with ends and sides flush, labels on inside. Measure 16 inches from one end and locate the center of the 3-1/2- inch face. Using 1-1/8-inch spade bit, drill a hole 1/2-inch deep into one 2-by-4, taking care to keep the drill at right angle to the board. Using 1/4-inch twist drill bit, finish drilling through both 2-by-4s, creating a stepped hole. Tip: The starter point of the spade bit will create a pilot for the twist bit.
- On opposite end of the 2-by-4s, measure 6 to 7 inches back from the end of one 2-by-4, on the short face, and using a straight edge, pencil in a cut line from your mark to the corner of the opposite short face. Cut along pencil line using handsaw, circular saw, or reciprocating saw to create a spiked “foot.” Tip: Cut second 2-by-4 opposite of first.
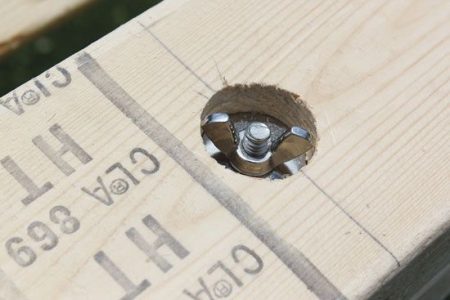
- Insert carriage bolt through 1/4-inch hole, from side without 1-1/8-inch step. Using mallet, set bolt securely into hole, so square-cut underside of bolt head bites into wood. Seat fender washer onto bolt from opposite side, settling it into 1-1/8-inch step. Secure with 1/4-inch wingnut.
![]()
- Measure 6 inches from bolt hole, away from short end on one leg. Mark center of outer wide face of top board. Drill a pilot hole approximately 1-1/2 inches deep, using 3/16-inch twist drill bit. Screw 1/4-inch eye bolt into hole, bottoming threads out and positioning eye bolt so it runs with the leg.
- Repeat above steps with second set of straight 2-by-4s to create two sets of hinged side legs. Set aside.
![]()
The ridgepole
- On remaining 2-by-4, measure in 4 inches and 5-1/2 inches from one end, marking with pencil on edge of long face. Measure in from edge 2 inches at each mark. Using square, connect each point of laid out “box.” The wood inside this box will be removed in a wedge shape, in the following manner.
![]()
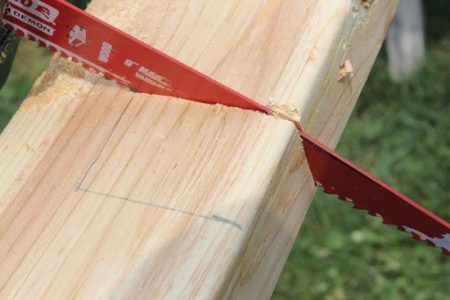
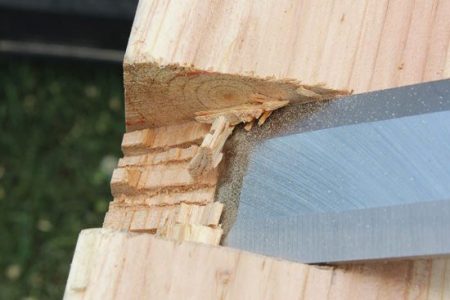
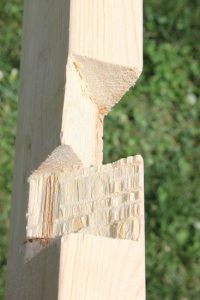
- Using a handsaw or reciprocating saw, carefully make a cut along one side of the box at an angle to create a cut running from the back of the box to the bottom of the short face of the 2-by-4. Take care to keep the cut square and inside the pencil marks. Repeat this cut on the opposite side of the box, again keeping the saw blade square and inside the pencil line. Make several more such cuts inside the two previous cuts, at about 1/8 inch apart. Use a wood chisel and mallet to gently break out remaining wood inside cut area. Smooth out base of cutout with wood chisel. Roll 2-by-4 over and lay out a second cutout box on the opposite face, between 5-1/2 and 7 inches from the end. Note: Both cutouts will share the same short face and one cut side. Repeat this process on opposite end of 2-by-4, making certain all four wedge cuts share the same short face of the 2-by-4. These cuts create sockets for the ridgepole to fit into the two leg sets.
![]()
- On each end of ridgepole, locate center. Tip: use a straight edge and pencil to draw two lines cross corner on the board end, creating an “X.” The center of the X is the center of the board. Drill a pilot hole in each end at center, using 3/16-inch twist drill bit. Screw remaining eye bolts into pilot holes.
![]()
Setting up the tomato string trellis

- This step benefits greatly from an extra set of hands. Open the first leg set so pointed feet are about 3 to 4 feet apart, depending on your tomato bed width, at one end of the bed. Press points of feet a few inches into the soil. Position feet of second set of legs roughly in position, with legs laying on ground. Set ridgepole on top of the first set of legs, so that the cutout notches settle down around the legs, taking care not to knock leg set over. (You may need to reposition legs so that their orientation matches the cutouts on the ridgepole.) Lift other end of ridgepole in the air while standing second leg set upright. Settle second set of notches in place on second leg set. Settle feet of both leg sets securely into soil of bed. Securely tie a short length of sisal twine to ridgepole eye bolt and leg eye bolt on each end, maintaining as much tension as possible, to create a guy line and secure the ridgepole to the legs.
![]()
- Transplant tomato plants directly beneath ridgepole, and space evenly. Tie a length of twine to the ridgepole above each plant, long enough to reach the ground, with a foot of twine to spare. Use an asparagus knife or a similar forked tool to sink the loose end of the twine into the soil at the base of each plant. Twirl the twine around the leading stems as the tomato plants grow throughout the season. If you sucker your plants, you can easily train them to single vines. If you prefer allowing them to grow rampant, you can add extra twine to support each vine as needed. The vines’ own weight will keep them secure on the twine, and there is no need to tie the vines fast, risking snapped stems.
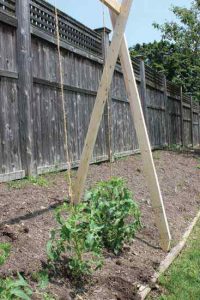

By late July, your tomato string trellised vines should be loaded with ripe tomatoes ready to pick. They’ll also be clean, and easy to find and pluck.
Related: Try a variety of tomato that harkens back to the days of the early frontier vegetable garden.
Andrew Weidman lives and writes in Lebanon, Pennsylvania. He has often found creative solutions to common garden problems, although most of his best ideas have come from someone else.